站内搜索
最近浏览
- WinCE Security...
- xdebug配置说明
- VC++ 获取文件的创建、修...
- ASP进度条
- 简单代理服务器C代码实现(S...
- 程序设计竞赛试题选(02)
- 如何在ASP程序中打印Acc...
- UTF-8和16进制区间
- ASP实用技巧:强制刷新和判...
- 运行中程序删除自己的方法
- asp提高首页性能的一个技巧
- [J2EE]J2EE 应用服务器技术
- VB变量命名规范
- C语言常见错误小结
- (摘自网络)如何在IIS中调...
推荐文章
热文排行
手把手教你在VirtualBox中与主机共享文件夹
设置共享文件路径
点击虚拟机 设置-->选择 共享文件夹

(图1 设置共享文件夹)
设置共享文件夹路径
1 选择路径
2 填写自定义的共享名称(在后面需要与挂载路径相对应)
3 设置自动挂载/固定分配
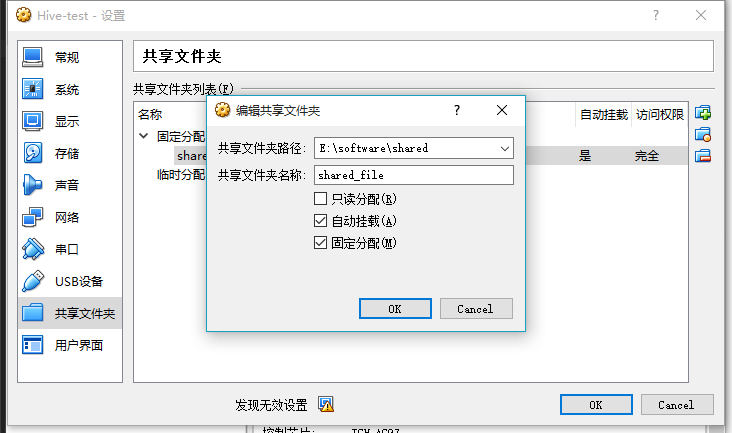
(图2 设置共享文件路径属性)
安装VirtualBox增强工具
先安装必备的包
执行下面的命令:
yum install -y gcc gcc-devel gcc-c++ gcc-c++-devel make kernel kernel-devel
安装完后,重启虚拟机:
shutdown -r now
安装virtualBox增强工具
点击 设置-->点击 安装增强功能...
(图3 点击设置)
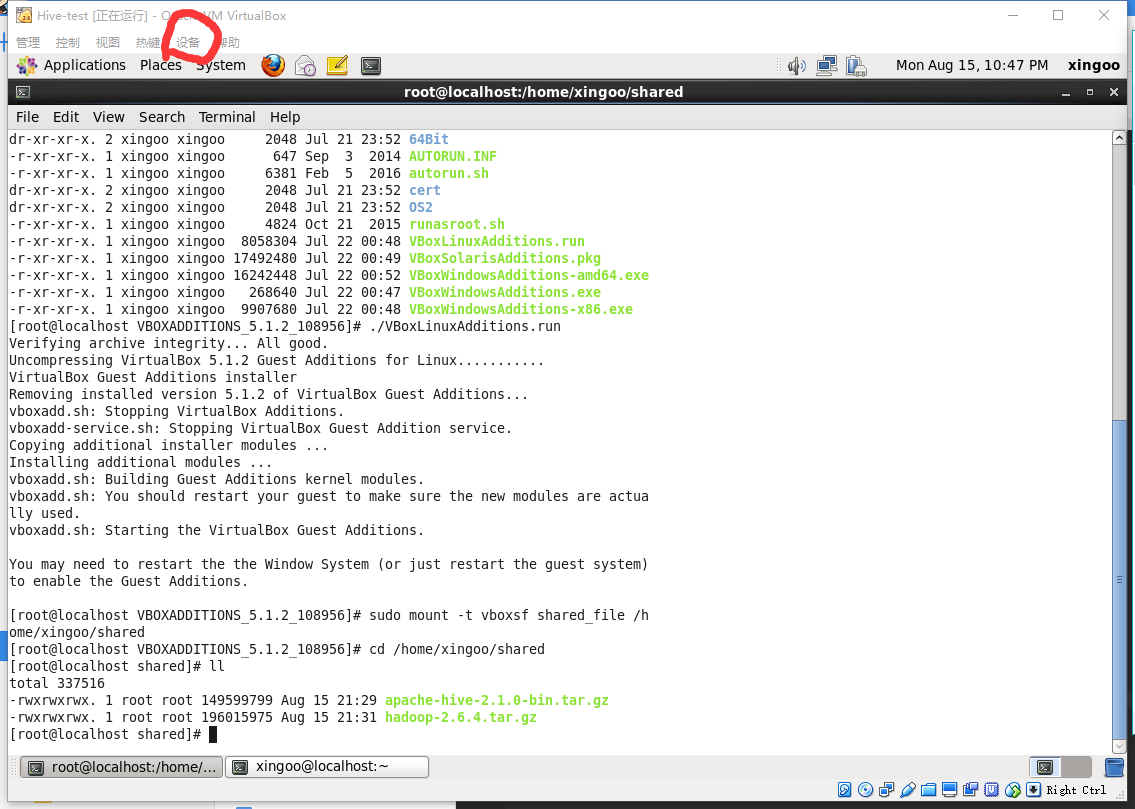
自动执行安装 或者 进入目录/media/VBOXADDITIONS_5.1.2_108956,执行命令
./VBoxLinuxAddtion.run
得到输出内容
[root@localhost VBOXADDITIONS_5.1.2_108956]# ./VBoxLinuxAdditions.run
Verifying archive integrity... All good.Uncompressing VirtualBox 5.1.2 Guest Additions for Linux...........VirtualBox Guest Additions installerRemoving installed version 5.1.2 of VirtualBox Guest Additions...
vboxadd.sh: Stopping VirtualBox Additions.
vboxadd-service.sh: Stopping VirtualBox Guest Addition service.Copying additional installer modules ...Installing additional modules ...
vboxadd.sh: Building Guest Additions kernel modules.
vboxadd.sh: You should restart your guest to make sure the new modules are actually used.
vboxadd.sh: Starting the VirtualBox Guest Additions.You may need to restart the the Window System (or just restart the guest system)
to enable the Guest Additions.
即安装成功!
挂载共享文件夹
切换到root用户输入挂载命令:
sudo mount -t vboxsf shared_file /home/xingoo/shared
注意格式为
sudo mount -t vboxsf 共享文件夹名称(在设置页面设置的) 挂载的目录
然后进入/home/xingoo/shared,就可以看到windows中的文件了

(图4 windows文件)
[root@localhost shared]# lltotal 337516-rwxrwxrwx. 1 root root 149599799 Aug 15 21:29 apache-hive-2.1.0-bin.tar.gz-rwxrwxrwx. 1 root root 196015975 Aug 15 21:31 hadoop-2.6.4.tar.gz
其他使用技巧
如果宿主机是windows经常需要来回的拷贝内容,那么可以打开【共享粘贴板】,步骤为:
设备-->共享粘贴板-->双向
注意:
1.若想删除挂载,可执行命令
umount -f /mnt/share
2.若想开机自动挂载,可以在 /etc/fstab 文件末添加一项
sharing /mnt/share vboxsf defaults 0 0
或
sharing /mnt/share vboxsf rw,gid=100,uid=1000,auto 0 0
3.为了方便,可以在桌面上新建一个文件,内容为:
#!/bin/sh
sudo mount -t vboxsf sharing /mnt/share
4、如果以上方法不行,可以按以下方法处理!
在文件 /etc/rc.local 中(用root用户)追加如下命令
mount -t vboxsf sharing /mnt/share
最后重启系统,大功告成!!!
[ly70041]
添加时间:2017-08-05